I have been planning this for over a week. I just didn't get to it until yesterday with such a hectic week. My son just got his drivers permit on Friday!! We are all excited here about that.
I want to thank you all that commented on the previous post regarding organizing. I know that it gets asked everywhere, but now I have my own personal place to find it. I will be using these concepts. By the way if you haven't seen the
Scrapnoizer, you will want one. I saw this on a business board, then on
Vicki Chrisman's blog where she altered it, and I think I am going to buy some for the store and myself for the smaller items.
Ok with out any more waiting, let me share my idea with you. I have altered a couple of composition notebooks that are very cute, BUT I end up having to toss the book when its used up. I hate seeing that happen. So, when the new
iron on vinyl was showcased in papercrafts for this month I ordered it for
the store and got some for myself.
I knew right away that I wanted to create another notebook, but one that would not have to be thrown out and I can change out like shoes or sunglasses. So I thought about the old brown paperbag book covers we did in school. Then I used that concept to do this vinyl book cover that I can change out when I need new notebooks or have a new idea!! Brilliant if I don't say so my self (and I did-LOL)
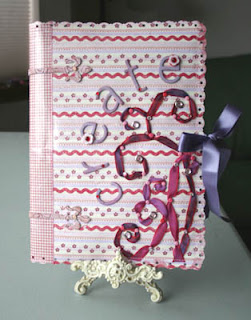


 Supplies used: 1yd Vinyl ( you will have about 10-12" leftover), 12" of 3/4" satin ribbon for the tie, approx. 3/4 yd. of 1 1/4" ribbon and about 1/2 yd of the other 1/4" ribbon for the Wrap & twist flourish technique. About 33 brads of different varieties, more or less depending on your design, Mini clear crystals (topped a few of the brads), Some Red mini & medium crystals for alphas and middle of flower buttons, Daisy D's Maybe Baby Buttons, Maybe baby papers, Basic Grey Sweets chipboard font, wisteria cats eye, Swirl elements grunge board hinges, Chestnut roan cats eye, Ruby red cats eye, Pink Taffy Glimmer mist (will be in store on the 1st), 8 cream brads for the hinges, Crop a dile for hole punching, Sewing machine, Glue, trimmer.
This was very easy to do, the most complicated part was the wrap & twisting.
Instructions: Cut two sheets 11" x 7 1/8" and a small strip that is 2 1/4" x 11". Glue small strip inbetween the front and back panels you cut. The total width should be 16 1/2" x 11".
*Next use the piece that was left over from cutting the front and back panels- just make the length 11" the wide is already perfect.
*Place the front & back panel piece on the vinyl to cut your vinyl piece. Then take the inside flaps you just cut and place them side by side on the vinyl and cut that piece as well.
*Follow insturctions with the vinyl and then trim the excess off the edges of all the pieces.
*At this point you design your front panel. Make sure to mark 1/2" in from the edge all around so you don't design past the area where the stitching line will be.
*In this case, I did alot of brads and didn't want the notebook to hit the back sides when sliding in. So more vinyl was cut and applied to the inside covering all the backs of the brads.
*Mark where your tie will go on the front and back.
*Now it is time to stitch. Place your inside panel for the back on, with back panel of book cover facing you & starting at the bottom around the notebook stitch 1/2" away from the edge. I stopped where the ribbon would be and started again where it would end on the other side and did the same as I reached the tie area on the other panel. (remember to place front inside panel on as you continue to the front).
*For this cover I used a scallop scissor and cut the design and used the crop a dile for the holes.
*Then slide ribbon in its place on the back. Stitch, and do the same for the front.
So, what do you think cool huh?