I needed a birthday card for tonight, and I thought I would use some of the digi kits I had and post a tutorial on how to do this.
What is hybrid, it is using digitally printed papers or embellishments, word art etc and then printing them off and then work with them as you would with normal scrapping or cardmaking. Plus you can add even more paper, embellishments etc that you already own.
Here is the card, close up and inside (sorry the lighting was bad)
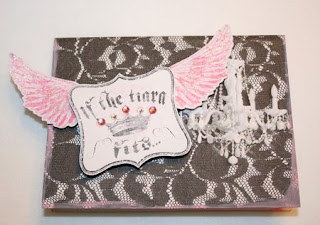
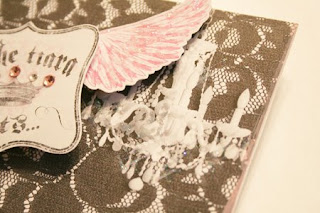

I needed to keep it simple, so I will list the physical supplies and then the images and steps with the instructions under the photos.
Supplies list: Cut 1 white cardstock to 8.5 x 11, Paint, crystals/rhinestones, Stickles glitter- stardust, dimensional pop up adhesive, Basic Grey alpha stickers, white pen,Card base, paint brush, scissors, trimmer.
Digital Supplies: PSE 3, NLD steps to heaven from Shabbypickledesigns. The Tiara journaling card, and wings are from Lisa Sisneros' kit Fetish at Little Dreamer Designs
We will start off with the digital part. I did this using PSE 3. First open your program, open a new document. Since I planned to do a card I made the document 8.5 x 11. This meant I was working sideways as you will see. You could put in 11 x 8.5 and then it will be horizontal.
****NOTE*** To see these images larger, just click on them.
 1. Click on your start button and open the place you store your digital items. In this case I keep them in a file called digital downloads in my computer. so I click start> My Computer>Fdrive (external hard drive for me) in your case it could be my picutres> then digital downloads file> I click on the folder I want to use. As seen above one is highlighted in the lower right corner.
 2. Click to open the file, then I click once to highlight the paper I want to use and then click and drag it to the PSE browser window. As seen it will drop the paper larger on the screen.
 3. Now go to select at the top>then click ALL. this will make marching ants around the jpg image. Then you will go to edit>copy.
 4. Then go to File>new>blank file. Click ok to the size and then right click paste.
 5. Now using the crop tool, make a box the size you would like. I was working on a card size that was 5.5 x4. Click crop.
 6. Go to select>ALL. Then click Edit>Copy. Then click back onto your new blank original document that was 8.5 x 11
 7. Click paste. Click on the little move tool (which on my pse just above the magnifying glass). Click on the image and I moved it to the top of the page.
 8. since my card from top to bottom was 8.5 and the width about 4 I needed to get the correct proportion. To make this easier momentarily to this. Click on View>rulers and then you will see the numbers show up and you can make sure your image is the correct size. To remove the ruler, I go back to view and click rulers again and it turns off.
 9. Now time to move onto the next item. I wanted the chandelier from the elements that matched the paper, but I didn't want to cut it out, so I planned to print it right onto the card, just under the fold. So you bring up the same folder, I maneuvered to the chandelier, clicked and dragged to the browser like I did with the paper. Then I did the same process. Click Select>ALL, then Edit>Copy and went to the page that has my lace on it in position and pasted.
 10. I used the move tool and put it in place. You can grab the corner of the box that is around the item to size it. Then I click the hand to take the box off.
 11. To make it look more real, I wanted a shadow, so as seen here I click on drop shadow and then did one click on the type of shadow I wanted.
 12. I wanted the cute journaling card, to cut out and use on the card, so I clicked and dragged, did the select all and then edit copy and pasted it onto my document. I positioned it under the lace, since that area is going to be just white cardstock and where I will put my elements I will cut out after printing.
 13. I did the same process for the wing, grabbed the corner of the box around it and made it smaller. Then positioned it on the page.
 14. I wanted to wings, and needed the left wing, and there was only a right wing. SO this is what you do. You go to the layers box on your right. make sure the wing layer is highlighted blue, then right click and click Duplicate layer. Then go up and click on your move tool. You will notice the box around the same wing. Grab it and move it. You will see that it is a second right wing.
 15. As you can see here, I moved it just a smidge.
 16. Now grab the little box that is right in the middle to the right of the wing and while holding the cursor down move it directly to the left to flip it.
 17. Here you see it has been flipped and sized to match the right wing.
 18. Now at this point you could go to print. However, I wanted the chandelier to look blingy!!
 19. So Click on layers at the top>new layer.
 20. Click on the foreground color box. I wanted white for the shine. So I made sure it showed white and clicked ok.
 21. Click on your brush tool, pick the brush- in this case I have ss-sparklies brush picked and I sized it to the size of bling I wanted.
 22. Then Click on Layer>new layer. Make sure the new layer in the layers box is above the chandelier. Then just click where you want your bling.
 23. Finishing-VERY simple. Just click on Layers>merge visible. Then if you want to save it you can by clicking save>name it and place it where you want it saved. I did not save mine. I just clicked File>print, and ok'd the printed. Then out it came.
24. Then I took the trimmer cut out the lace, folded and creased it to match the white cardbase I had. Then attached it to the card base with glue.
25. Cut out the embellishment pieces. I put the dimensional adhesive on with two layers of thickness on the journaling card, and only one layer on the wings. So the wings were going to float above the base and then the card floats above the wings. I attached the wings first. Then applied the stickles to them. Then attached the bling to the crown on the card, then attached the journaling card to the card carefully not to distrub the wet stickles.
26. I let it dry for about 15 minutes. Then painted the inside of the card and then edge of the card with a brush and let it stand to dry. Then I applied the letter stickers inside. Doodles with the white pen and then added more stickles to the letters. All done.
I hope you try this and have fun!!

 This next one is the final image


 Then click layers-merge visible and save. Here is the texturized photo with the frame
  Hopefully you found this helpful. Thanks for looking and the next image is the cupcakes with a digital frame added.


